Build Your First MCP Server in Python: A Complete 2026 Tutorial
Step-by-step guide to building a Model Context Protocol server that connects AI agents to real-world APIs. From project setup to production deployment.
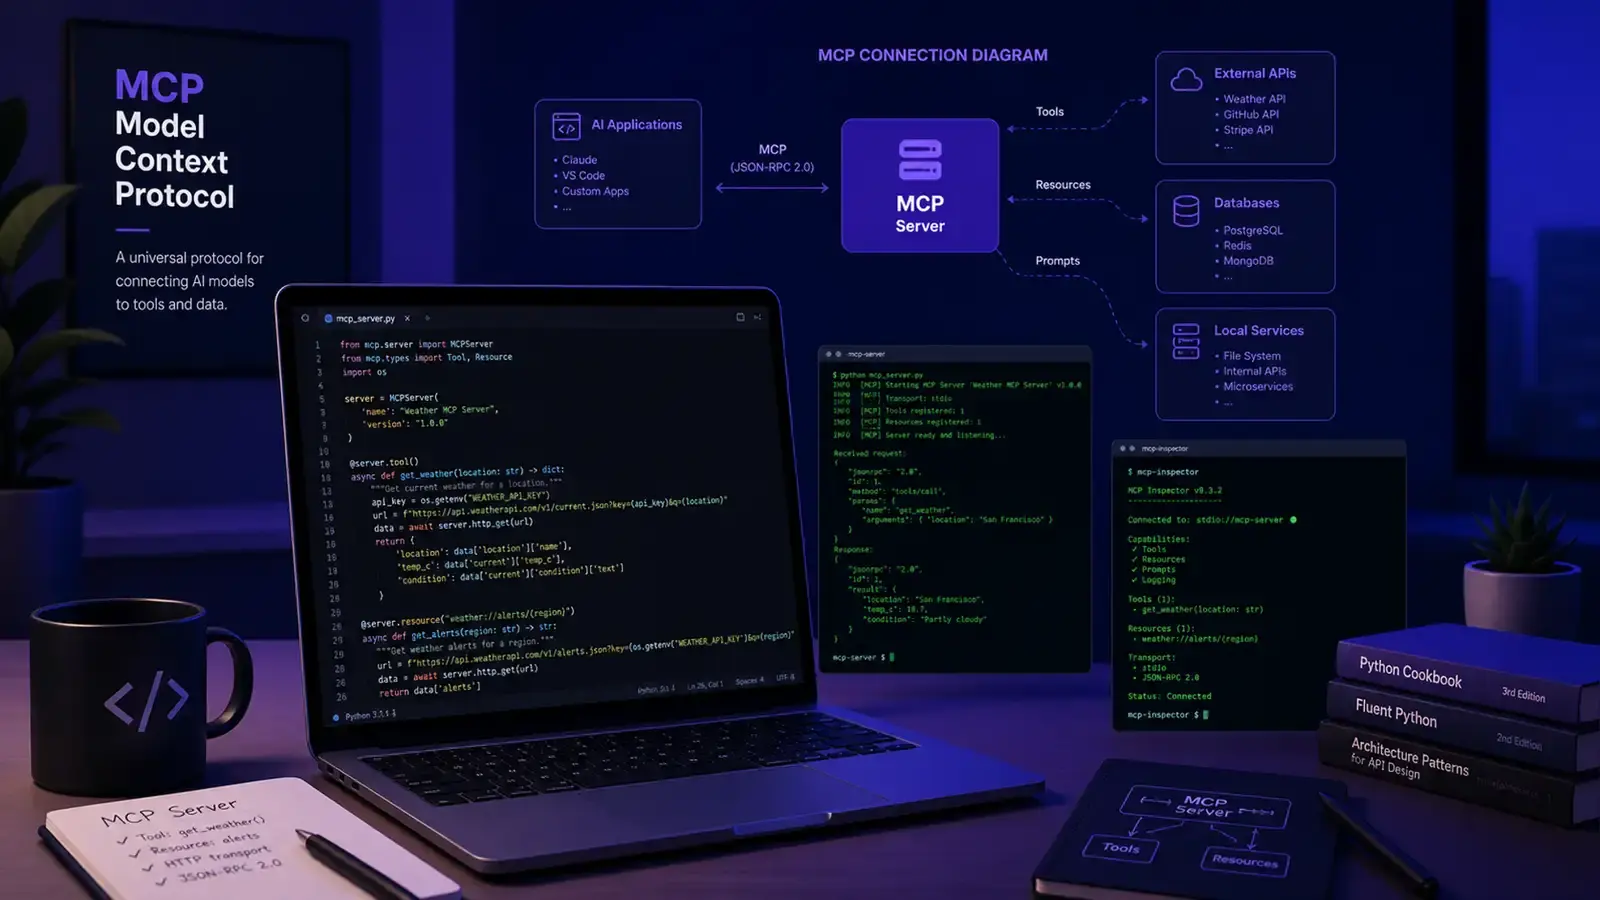
The Model Context Protocol has become the standard way for AI agents to interact with external tools and data sources. If you have been using AI coding assistants like Claude Code or Cursor, you have already benefited from MCP without realizing it. Every time your assistant reads a file, searches the web, or queries a database, it is likely using an MCP server under the hood.
Building your own MCP server is not as hard as it sounds. In this tutorial, you will build a fully functional MCP server in Python that connects an AI agent to a real-world API, deploy it locally, and test it with the MCP Inspector. By the end, you will understand the architecture well enough to build servers for any API you need.
What MCP actually is (and why it matters)
MCP is a protocol that defines how AI agents communicate with external tools. Think of it as a USB port for AI: instead of building custom integrations for every AI framework, you build one MCP server and it works with any MCP-compatible client. The protocol was designed by Anthropic and has quickly become the industry standard, with adoption from OpenAI, Google, Microsoft, and dozens of other companies.
Before MCP, if you wanted your AI agent to access a database, you had to write custom code for each AI framework. OpenAI needed one integration, Anthropic needed another, and Google needed a third. MCP standardizes this. You build the server once, and it works everywhere. This is not just convenient. It fundamentally changes the economics of building AI tools, because developers no longer need to maintain separate integrations for each platform.
The architecture is simple. An MCP server exposes three things: tools (functions the AI can call), resources (data the AI can read), and prompts (templates for common queries). The client (your AI assistant) discovers these capabilities at runtime and uses them as needed.
This separation matters because it keeps your AI logic separate from your tool logic. The AI decides what to do. The MCP server decides how to do it. Neither needs to know the details of the other.
Setting up your project
Create a new directory and set up a Python project:
mkdir mcp-weather-server
cd mcp-weather-server
python3 -m venv .venv
source .venv/bin/activate
Install the MCP Python SDK:
pip install mcpThe SDK handles all the protocol details. You define your tools and resources using Python decorators, and the SDK takes care of serialization, transport, and error handling. You do not need to understand JSON-RPC or the wire format. The SDK abstracts all of that away.
Create your main server file:
touch server.pyThat is all you need for the project structure. MCP servers are intentionally lightweight. The protocol handles the complexity; your code just defines what the server can do.
For this tutorial, we will build a weather server that connects to the National Weather Service API. This API is free, requires no authentication, and returns real data. It is a good choice for learning because it exercises the full range of MCP capabilities: tools that take parameters and return results, error handling for API failures, and data formatting for AI consumption.
Building the server
Here is a complete MCP server that provides weather data:
import httpx
from mcp.server.fastmcp import FastMCP

mcp = FastMCP("weather-server")

NWS_API_BASE = "https://api.weather.gov"
USER_AGENT = "weather-mcp-server/1.0"

async def make_nws_request(url: str) -> dict | None:
    """Make a request to the NWS API with proper headers."""
    headers = {
        "User-Agent": USER_AGENT,
        "Accept": "application/geo+json",
    }
    async with httpx.AsyncClient() as client:
        response = await client.get(url, headers=headers, timeout=30.0)
        response.raise_for_status()
        return response.json()

def format_alert(feature: dict) -> str:
    """Format a weather alert for display."""
    props = feature["properties"]
    return (
        f"Event: {props.get('event', 'Unknown')}\n"
        f"Area: {props.get('areaDesc', 'Unknown')}\n"
        f"Severity: {props.get('severity', 'Unknown')}\n"
        f"Description: {props.get('description', 'No description available')}\n"
    )

@mcp.tool()
async def get_alerts(state: str) -> str:
    """Get active weather alerts for a US state.

    Args:
        state: Two-letter US state code (e.g., CA, NY, TX)
    """
    url = f"{NWS_API_BASE}/alerts?area={state}"
    data = await make_nws_request(url)

    if not data or not data.get("features"):
        return "No active alerts found for this state."

    alerts = [format_alert(f) for f in data["features"][:5]]
    return f"Found {len(data['features'])} alerts. Showing first 5:\n\n" + "\n---\n".join(alerts)

@mcp.tool()
async def get_forecast(latitude: float, longitude: float) -> str:
    """Get weather forecast for a location.

    Args:
        latitude: Latitude of the location
        longitude: Longitude of the location
    """
    points_url = f"{NWS_API_BASE}/points/{latitude},{longitude}"
    points_data = await make_nws_request(points_url)

    if not points_data:
        return "Could not retrieve forecast data for this location."

    forecast_url = points_data["properties"]["forecast"]
    forecast_data = await make_nws_request(forecast_url)

    if not forecast_data:
        return "Could not retrieve forecast."

    periods = forecast_data["properties"]["periods"][:5]
    forecasts = []
    for period in periods:
        forecasts.append(
            f"{period['name']}: {period['detailedForecast']}"
        )
    return "\n\n".join(forecasts)

if __name__ == "__main__":
    mcp.run()
This server exposes two tools. The first takes a US state code and returns active weather alerts. The second takes latitude and longitude coordinates and returns a five-day forecast. Both use the National Weather Service API, which is free and requires no API key.
The key pattern here is the @mcp.tool() decorator. You write a Python function with type hints and a docstring, and the decorator registers it as an MCP tool. The docstring becomes the tool description that the AI agent sees. Type hints become the parameter schema. The AI uses this information to decide when and how to call your tool.
Running and testing locally
Start the server in stdio mode (the default for local development):
python server.pyThe server will start and wait for connections on standard input/output. This is how most MCP servers run during development. The client sends JSON-RPC messages to stdin, and the server responds on stdout. The process stays alive until you kill it or the client disconnects.
To test it, you need an MCP client. The easiest option is the MCP Inspector, a web-based debugging tool that comes bundled with the MCP SDK:
npx @modelcontextprotocol/inspector python server.pyThe Inspector opens in your browser and lets you browse your server’s tools, send test requests, and see the raw JSON-RPC messages flowing between client and server. It is the fastest way to verify your server works correctly before connecting it to a real AI agent.
You can also connect it to Claude Desktop by adding this to your claude_desktop_config.json:
{
  "mcpServers": {
    "weather": {
      "command": "python",
      "args": ["/path/to/server.py"]
    }
  }
}
Once connected, Claude can call your weather tools whenever a user asks about weather. The AI handles the decision-making; your server handles the API calls. This separation is what makes MCP powerful. You do not need to tell the AI how to use your tools. It figures that out from the tool descriptions and parameter schemas you provided.
Adding resources and prompts
Tools are not the only thing MCP servers can expose. Resources provide data that the AI can read, and prompts offer templates for common queries. Understanding all three capability types is important because they serve different purposes in the MCP architecture.
Add a resource to your server:
@mcp.resource("weather://alerts/stats")
async def get_alert_stats() -> str:
    """回傳目前警報的統計摘要。"""
    data = await make_nws_request(f"{NWS_API_BASE}/alerts?status=actual")
    if not data:
        return "無法取得資料。"

    features = data.get("features", [])
    severities = {}
    for f in features:
        sev = f["properties"].get("severity", "未知")
        severities[sev] = severities.get(sev, 0) + 1

    stats = "\n".join(f"  {k}:{v}" for k, v in severities.items())
    return f"目前活躍警報總數:{len(features)}\n按嚴重程度分類:\n{stats}"
Resources work like tools but are read-only. The AI can access them without explicit user permission, which makes them useful for providing context like summaries, statistics, or configuration data. The key difference is that resources are identified by URI (like weather://alerts/stats) rather than by function name. This URI scheme gives you a clean way to organize your data endpoints.
Add a prompt template:
@mcp.prompt()
def weather_report(state: str) -> str:
    """Generate a prompt for creating a weather report."""
    return f"""Analyze the current weather conditions for {state}.

1. Check active weather alerts using the get_alerts tool
2. Get forecasts for the three largest cities in the state
3. Summarize the overall weather picture
4. Highlight any severe weather risks

Format the report with clear sections and actionable recommendations."""
Prompts are templates that help users get started with common tasks. When a user selects a prompt, the AI receives the template text and can then use your tools to fill in the details. Think of prompts as starting points that guide the AI toward a useful workflow without requiring the user to write a complex query from scratch.
Production deployment
Local stdio mode works for development, but production deployments need HTTP transport. MCP supports Server-Sent Events (SSE) for remote servers. This lets multiple AI agents connect to your server over the network instead of spawning a new process for each connection.
Modify your server to support HTTP:
from mcp.server.fastmcp import FastMCP

mcp = FastMCP("weather-server")

# ... your tools and resources here ...

if __name__ == "__main__":
    import sys
    if "--sse" in sys.argv:
        mcp.run(transport="sse")
    else:
        mcp.run()
Run with SSE transport:
python server.py --sseThe server now listens on HTTP port 8000. Remote MCP clients can connect by pointing to your server URL. For production, put this behind a reverse proxy (nginx or Caddy) with HTTPS and authentication. Never expose an MCP server directly to the internet without these protections.
For containerized deployment, add a Dockerfile:
FROM python:3.12-slim
WORKDIR /app
COPY requirements.txt .
RUN pip install --no-cache-dir -r requirements.txt
COPY server.py .
EXPOSE 8000
CMD ["python", "server.py", "--sse"]
Build and run:
docker build -t mcp-weather .
docker run -p 8000:8000 mcp-weather
Containerization makes deployment consistent across environments. Your server runs the same way on your laptop, in a staging environment, and in production. This matters because MCP servers often depend on specific Python versions and package versions. Docker eliminates the “it works on my machine” problem.
When deploying to production, also consider logging and monitoring. Add structured logging to your server so you can track which tools are being called, how often, and whether they are returning errors. This data helps you optimize your server and catch problems before users report them.
Error handling and best practices
MCP servers need to handle errors gracefully. The AI agent should always get a useful response, even when things go wrong. This is important because AI agents often retry failed tool calls automatically, and if your server returns raw exceptions, the agent might loop indefinitely or produce confusing error messages for the user.
Always return string responses from tools, even on errors. Never raise exceptions that propagate to the client. Instead, catch errors and return descriptive messages:
@mcp.tool()
async def safe_get_forecast(latitude: float, longitude: float) -> str:
    """Get weather forecast with error handling."""
    try:
        points_url = f"{NWS_API_BASE}/points/{latitude},{longitude}"
        points_data = await make_nws_request(points_url)
        if not points_data:
            return "Error: Could not find forecast data for these coordinates. Check that the latitude and longitude are valid US locations."
        # ... rest of the logic
    except httpx.TimeoutException:
        return "Error: The weather service is responding slowly. Please try again in a moment."
    except Exception as e:
        return f"Error: Unexpected problem retrieving forecast data. Details: {str(e)}"
This pattern ensures the AI always receives a string it can parse and act on. The error messages should be specific enough for the AI to understand what went wrong and potentially suggest a fix to the user.
Other best practices:
- Keep tool descriptions concise but specific. The AI uses these to decide which tool to call.
- Use type hints for all parameters. The MCP SDK uses these to generate the parameter schema.
- Set reasonable timeouts on external API calls. The AI agent should not wait forever.
- Log errors server-side for debugging, but return user-friendly messages to the client.
- Version your server. Include a version number in the server name so clients can track updates.
What comes next
This tutorial covered the basics of building an MCP server in Python. The same patterns work for any API: database queries, file system access, external service integrations, or custom business logic.
The MCP ecosystem is growing fast. The official registry at modelcontextprotocol.io lists hundreds of community servers. If you need inspiration, look at how others have built servers for GitHub, Slack, PostgreSQL, or Google Drive. Each of these follows the same pattern: define tools with decorators, handle the API calls, return useful responses.
The real power of MCP is composability. Once you have a server, any MCP-compatible AI agent can use it. You are not building for one AI framework. You are building for all of them. A server you build today works with Claude tomorrow and with whatever new AI assistant launches next year.
Start with one small, useful tool. Get it working. Add proper error handling. Then add more tools to the same server. The protocol handles the rest.
If you are building MCP servers in production, pay attention to authentication and rate limiting. Your server might be called hundreds of times per hour by an AI agent that does not know when to stop. Add API key validation, request throttling, and logging. These are not optional for production use.
The MCP specification is still evolving. New transport options, authentication methods, and capability types are being added regularly. Check the official documentation at modelcontextprotocol.io for the latest changes. The core patterns from this tutorial will remain relevant, but the details may shift as the protocol matures.
One more thing: the MCP community is active and helpful. If you run into issues, the GitHub repository for the MCP specification has discussions and examples. The best way to learn is to build something, break it, fix it, and share what you learned.
Reader Dispatches
No reader responses yet. Share your technical perspective below.
Related Posts
Getting Started with NVIDIA OpenShell: Installation, First Agent, and Where BlueField Sentry Fits
NVIDIA's OpenShell README installs a CLI and an empty Ubuntu sandbox. The first agent is a separate doc. BlueField Sentry is not step two.
Run a Local Agent Stack With LM Studio Bionic
LM Studio Bionic adds MCP apps, project files, and a local-or-cloud model switch on top of the old chat window. Here is how to pick a model for your RAM and stop sending the repo to a subscription API.
How to Set Up a Complete Local AI Stack with Ollama and Open WebUI in 2026
A step-by-step tutorial for running AI models on your own hardware using Ollama and Open WebUI — no cloud subscriptions, no data leaving your machine.